Training your rear deltoids is more important than you might think.
Today I’ll show you how strengthening these muscles can make your shoulders healthier and more stable.
Wondering how to improve your posture, especially if you sit a lot? We’ve got the answers. Plus, we’ll explain how focusing on your rear delts can give your upper body a more balanced and attractive look.
This isn’t just about looking good; it’s about keeping your shoulders strong and injury-free.
Jump to:
Why You Should Train Your Rear Delts (Posterior Deltoids)
Enhance Overall Shoulder Health and Stability
Training the rear deltoids is crucial for maintaining overall shoulder health and stability (Source). The shoulders are one of the most mobile joints in the body, and the rear delts play a pivotal role in stabilizing them. By strengthening these muscles, you can reduce the risk of injuries, particularly those related to rotator cuff issues and imbalances in shoulder mechanics. Strong rear delts ensure that your shoulders can handle various movements and weights more efficiently, promoting longevity in your fitness journey.
Balance Muscle Development for Improved Posture
In today’s world, where many people spend hours hunched over computers or smartphones, training the rear delts is essential for counteracting the common forward shoulder posture. Strengthening the rear deltoids helps balance the muscle development around the shoulder girdle (Source). This balance is key to maintaining an upright posture, reducing the strain on your neck and spine, and preventing the onset of postural issues like kyphosis.
Enhance Aesthetics for a Well-Rounded Physique
From an aesthetic perspective, well-developed rear delts contribute to a fuller, more balanced upper body (Source). They add depth and definition to the shoulders, creating a more pronounced V-shape that is highly sought after in bodybuilding and fitness. Training the rear delts not only complements the front and side deltoids but also enhances the overall appearance of the upper back.
Boost Performance in Sports and Daily Activities
For athletes and fitness enthusiasts, strong rear deltoids are a game-changer. They play a significant role in various athletic movements, such as throwing, swimming, and any activity requiring shoulder movement (Source). Moreover, in daily life, robust rear delts assist in lifting, pulling, and pushing motions, making everyday tasks easier and more efficient.
Prevent Imbalances and Reducing Injury Risk
Neglecting the rear deltoids can lead to muscle imbalances, where the front of the shoulder becomes dominant. This imbalance can increase the risk of shoulder injuries and impingements. Regular training of the rear delts ensures a more balanced development of the shoulder muscles, reducing the likelihood of injury and pain associated with muscle imbalances.
Big, Compound Exercises
Bent-Over Barbell Row
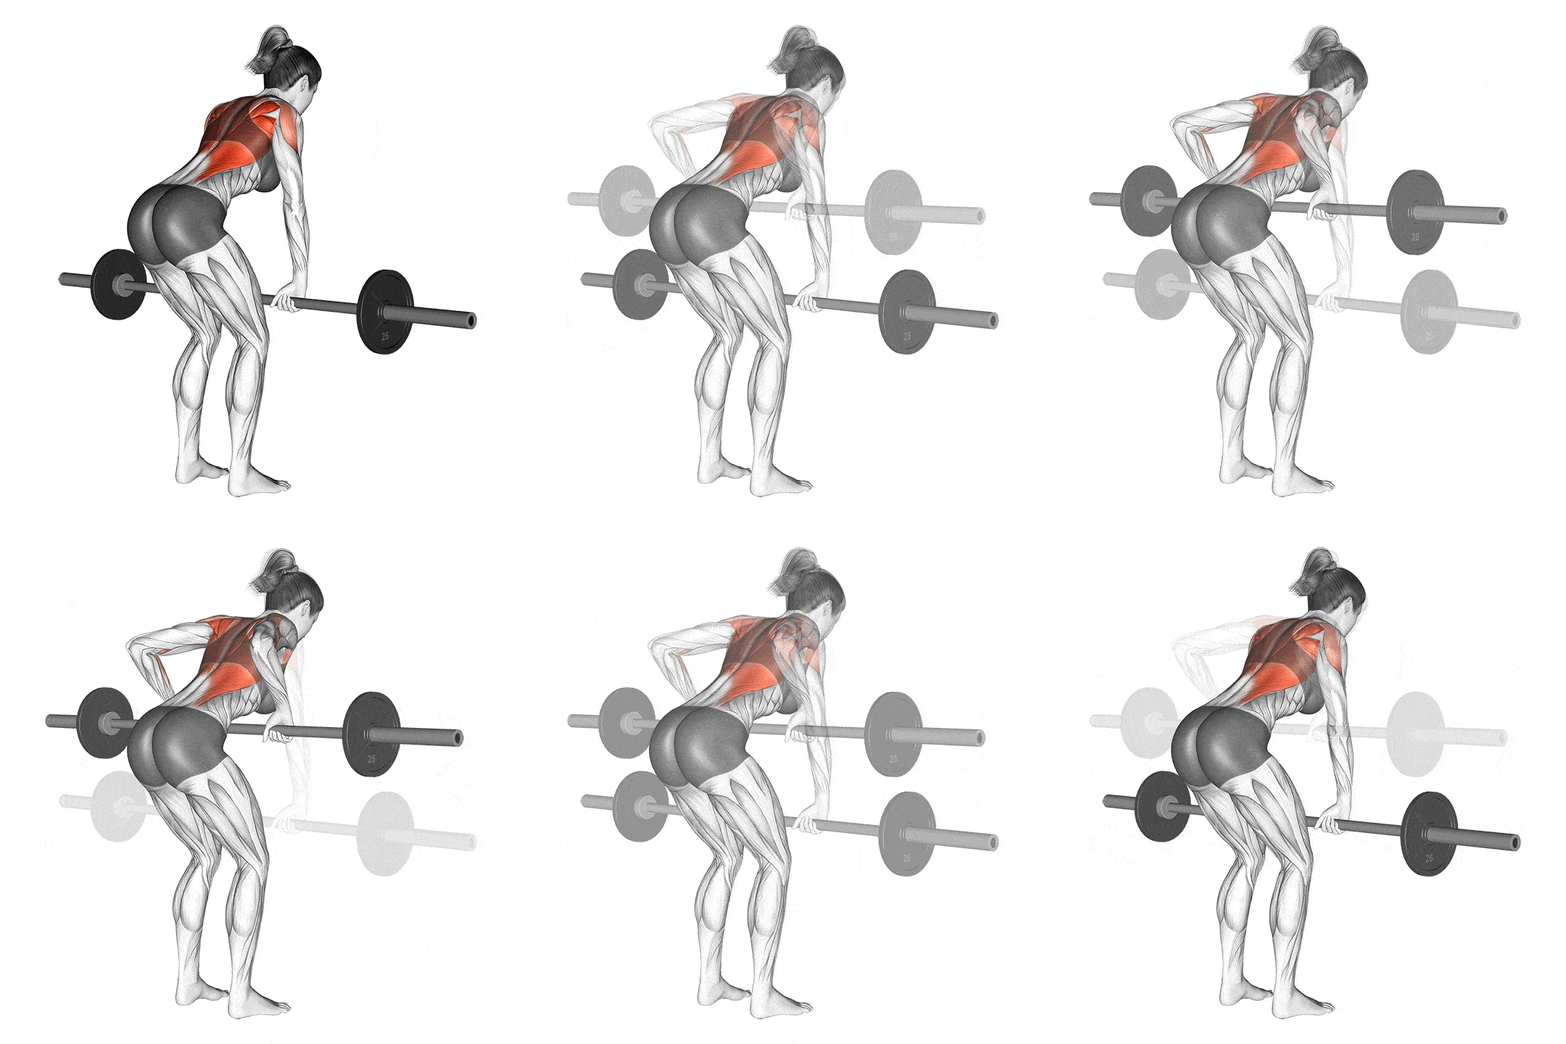
The Bent-Over Barbell Row shines in its ability to engage the posterior deltoids through a compound movement. As you row the barbell, the rear delts work vigorously to both stabilize the shoulder and aid in the pulling motion. This dual action ensures a deep and effective workout for these crucial muscles.
How to do it:
- Positioning for Success: Stand with your feet shoulder-width apart, knees slightly bent. Bend at your hips, keeping your back straight, until your torso is nearly parallel to the floor.
- Grip and Lift: Grip the barbell with an overhand grip, hands just wider than shoulder-width. Pull the barbell towards your lower chest, driving the movement with your elbows.
- Engage Your Rear Delts: As you pull, focus on squeezing your shoulder blades together. Feel your rear delts contracting, doing the bulk of the work.
- Controlled Descent: Lower the barbell slowly and with control back to the starting position. Resist the pull of gravity – this eccentric part of the lift is crucial for muscle development.
- Consistency is Key: Aim for 3 sets of 8-12 reps. Remember, quality trumps quantity – better to do fewer reps with proper form than to compromise your technique.
Dumbbell Bent-Over Row
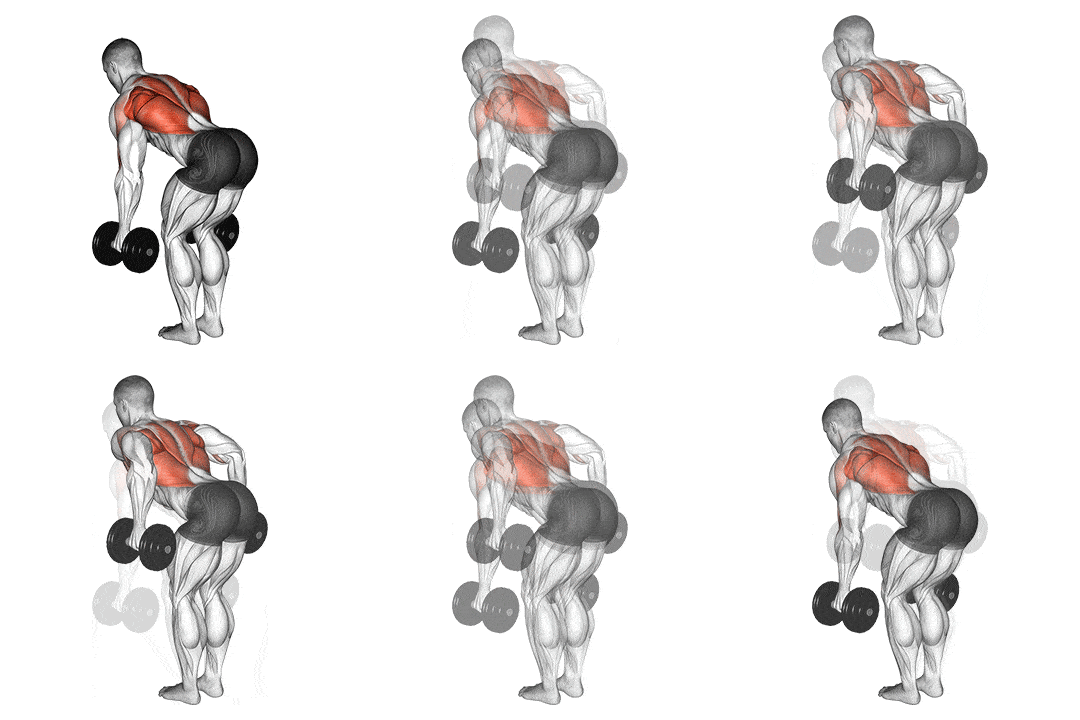
The key to the Dumbbell Bent-Over Row’s effectiveness lies in the pulling motion. When you row, your rear deltoids are activated to control and execute the movement. This exercise doesn’t just engage these muscles; it puts them through their paces, ensuring they are worked thoroughly and effectively.
How to do it:
- Starting Position: Stand with feet shoulder-width apart, a dumbbell in each hand. Hinge at the hips to lean forward, keeping your back straight and chest up. Your torso should be almost parallel to the ground.
- The Row: With palms facing each other, lift the dumbbells straight up towards your hips, keeping your elbows close to your body. Focus on using your rear delts and back muscles to drive the movement.
- Squeeze at the Top: As you reach the top of the row, really squeeze your shoulder blades together. This is where you’re engaging those rear delts to their fullest.
- Controlled Lowering: Lower the dumbbells slowly back to the starting position. This isn’t just about the lift; the lowering phase is equally important for muscle engagement.
- Repetition Counts: Aim for 3 sets of 8-12 reps. It’s not about lifting the heaviest weights; it’s about maintaining form and control to target those rear delts.
Single-Arm Dumbbell Row
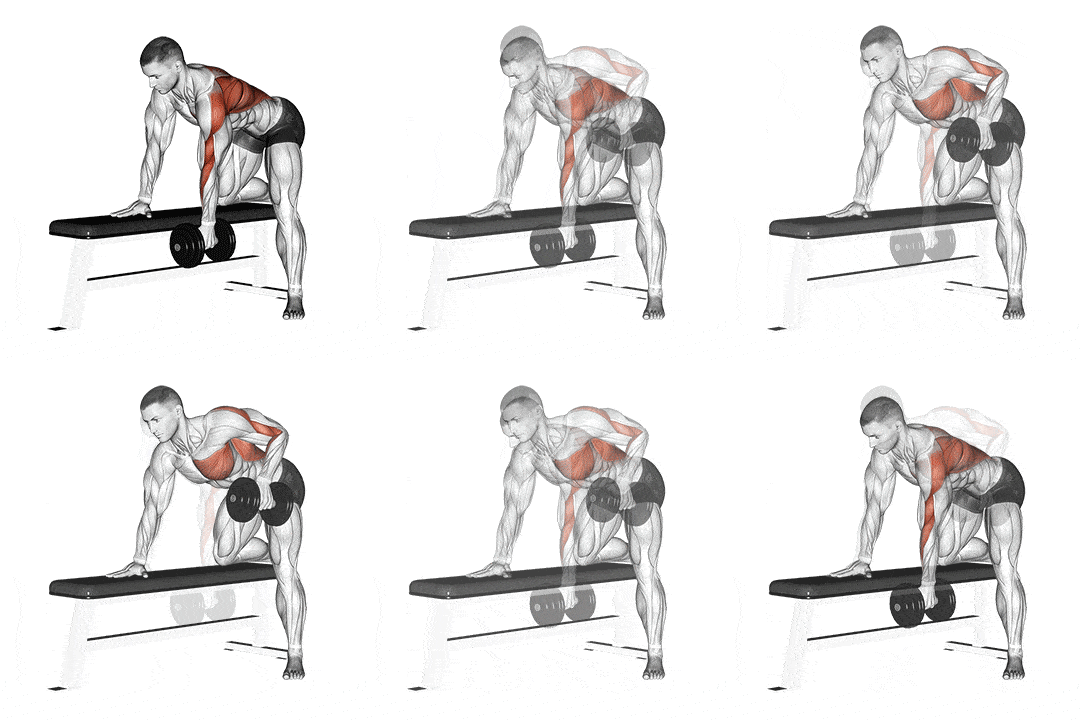
When you row with one arm, your rear deltoid works overtime to stabilize and lift. It’s a targeted strike, isolating and engaging the muscle in a way that’s both raw and refined.
How to do it:
- Position Perfectly: Place one knee and hand on a bench, creating a stable tripod with your body. The other foot is planted firmly on the ground. Hold a dumbbell in your free hand with a neutral grip.
- Engage and Lift: Pull the dumbbell upwards, focusing on driving the elbow past your torso. It’s not just a lift; visualize dragging the weight with your rear delt and upper back muscles.
- Peak Contraction: At the top of the movement, it’s crucial. This is where the magic happens. Squeeze your shoulder blade towards the spine, igniting a deep engagement in the rear delt.
- Controlled Descent: Lower the dumbbell slowly. This phase is as vital as the lift. Control is your mantra here, ensuring constant tension on the rear delt.
- Symmetry in Repetition: Aim for 3 sets of 10-12 reps each side. Balance is key. What you do on one side, you must replicate on the other.
Inverted Row
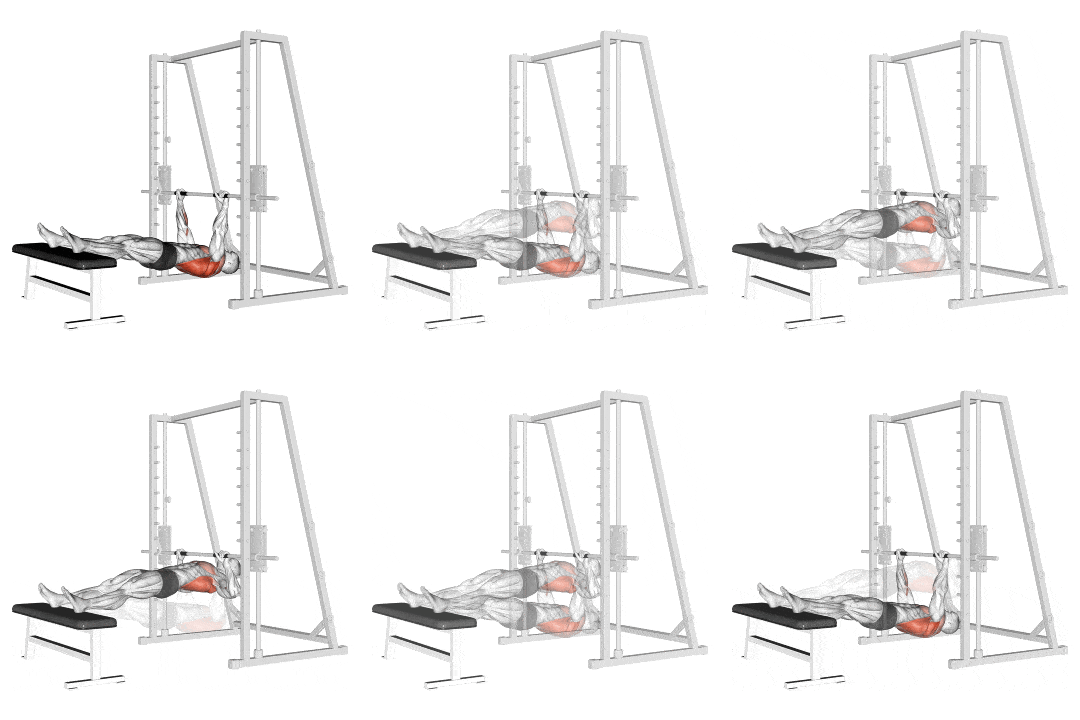
Why does the Inverted Row work so well for the rear delts? As you pull your body upwards, the rear deltoids are called into action to control and execute the movement. This exercise creates a unique blend of muscle engagement, from stabilizing your shoulders to powering the rowing motion, all focusing on the rear deltoid muscles.
How to do it:
- Setting Up: Position yourself under a stable bar set at waist height. Lie on your back and grab the bar with an overhand grip, hands slightly wider than shoulder-width apart.
- The Pull: Engage your core and glutes, keeping your body in a straight line. Pull your chest towards the bar by driving your elbows back. Focus on using your back and rear deltoids to power the movement.
- Peak Engagement: At the top of the row, squeeze your shoulder blades together for a moment. This is where your rear delts are working hardest, ensuring they receive maximum engagement.
- Controlled Descent: Lower yourself back to the starting position with control. The descent is just as important as the pull-up phase for maintaining tension in the rear delts.
- Repetitions and Consistency: Aim for 3 sets of 8-12 reps. Remember, form is paramount – it’s better to perform fewer reps correctly than to compromise your technique.
Wide-Grip Pull-Up

What makes the Wide-Grip Pull-Up particularly effective for the rear delts is the wide grip itself. This grip variation shifts the focus from the lats to the rear deltoids, engaging them intensely as you pull your body upwards. The movement requires these muscles to work not just in lifting but also in stabilizing, ensuring a comprehensive rear delt workout.
How to do it:
- Grip and Position: Grip the pull-up bar with your hands wider than shoulder-width apart. This wide grip is crucial for targeting the rear delts.
- Initial Lift: Hang from the bar with your arms fully extended. Keep your core engaged and your body straight.
- The Pull: Pull your body up towards the bar, leading with your chest and keeping your elbows pointed out. The focus should be on squeezing your shoulder blades together, using your rear delts and upper back to power the movement.
- Peak Contraction: Once your chin clears the bar, hold the position briefly to maximize the contraction in the rear delts.
- Controlled Descent: Lower yourself back to the starting position slowly and with control. This eccentric phase is just as important as the concentric phase for muscle development.
- Consistency in Reps: Aim for 3 sets of as many reps as you can manage with good form. It’s not about the number of reps but the quality of each rep.
Wide-Grip Lat Pulldown

What makes the Wide-Grip Lat Pulldown particularly effective for the rear deltoids? The wider grip naturally engages more of the upper back and shoulder muscles, including the rear delts. This grip variation alters the muscle recruitment pattern, putting a greater emphasis on the rear deltoids and ensuring they are actively involved in the movement.
How to do it:
- Setting Up: Adjust the lat pulldown machine to your height and select an appropriate weight. The goal is to challenge your muscles while maintaining good form.
- Grip and Position: Sit at the machine and grip the bar wider than shoulder-width apart. Sit down with your spine straight and feet planted firmly.
- Executing the Pulldown: Lean back slightly and pull the bar down towards your chest. Focus on driving the movement with your shoulders and upper back, not just your arms.
- Engagement at the Bottom: As the bar reaches chest level, concentrate on squeezing your shoulder blades together, maximizing the engagement of the rear deltoids.
- Controlled Ascent: Slowly let the bar rise back to the starting position, maintaining control and tension in the muscles throughout the movement.
- Consistency in Repetition: Aim for 3 sets of 8-12 reps. It’s essential to prioritize form over the amount of weight lifted to ensure maximum rear delt engagement.
Dumbbell Arnold Presses
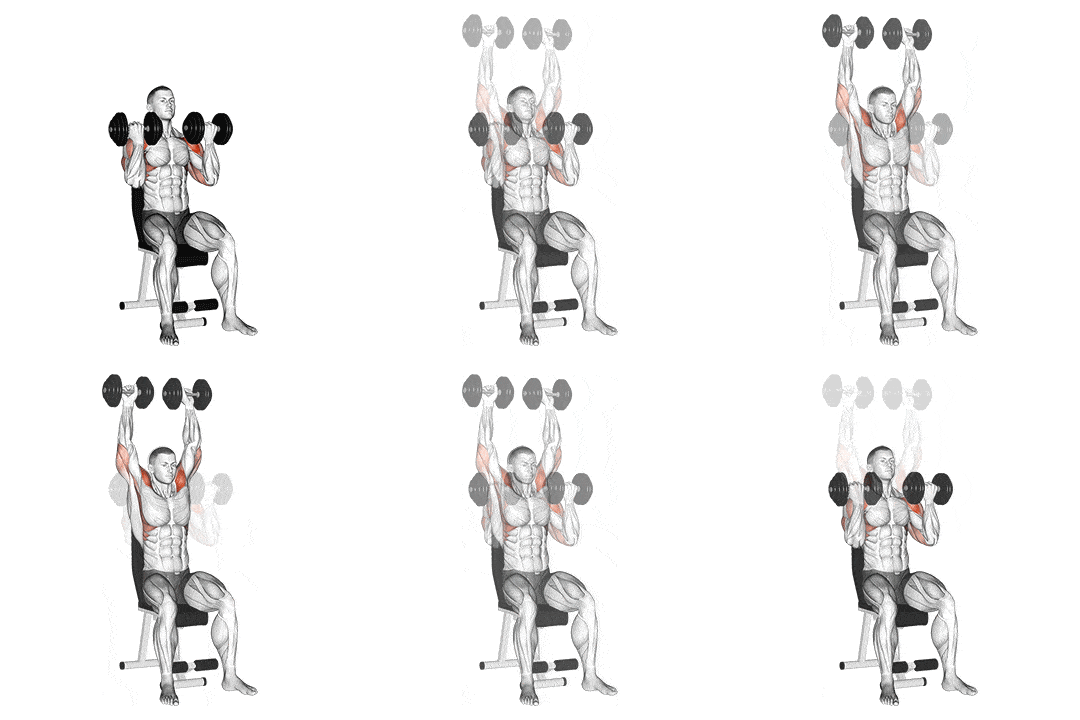
The magic of the Dumbbell Arnold Press in targeting the rear deltoids lies in the rotational movement of the arms. This rotation activates the shoulder muscles from various angles, with a significant emphasis on the rear deltoids. The exercise goes beyond the range of motion of traditional shoulder presses, ensuring a comprehensive workout for the rear shoulder muscles.
How to do it:
- Starting Position: Sit or stand with a straight back, holding a dumbbell in each hand at shoulder height. Start with your palms facing you and elbows bent.
- The Press: As you press the dumbbells overhead, rotate your arms so that your palms face forward at the top of the movement. This rotation is key to engaging the rear deltoids.
- Peak Contraction: At the top of the press, your arms should be extended overhead with palms facing away. Pause briefly to maximize the contraction in the shoulder muscles, especially the rear delts.
- Controlled Descent with Rotation: Lower the dumbbells back to the starting position, reversing the rotation so that your palms face you again at shoulder height.
- Repetition and Consistency: Aim for 3 sets of 8-12 reps. The focus should be on smooth, controlled movements and muscle engagement rather than lifting heavy weights.
Standing Cable Face Pull

The secret to the Cable Face Pull’s effectiveness lies in the combination of external rotation and horizontal pulling. This motion engages the rear deltoids intensely, along with the muscles of the upper back. The constant tension provided by the cable ensures that the rear delts are engaged throughout the entire range of motion, making this exercise a comprehensive rear delt builder.
How to do it:
- Setting the Stage: Position the cable machine with the pulley at about head height. Attach a rope handle to the cable.
- Grip and Stance: Stand facing the cable machine, feet shoulder-width apart. Grab the rope with both hands, palms facing each other.
- The Pull: Engage your core and pull the rope towards your face, separating your hands as you pull. Focus on using your rear deltoids and upper back to drive the movement.
- Peak Engagement: At the end of the pull, your hands should be beside your ears, elbows flared out. It’s crucial to squeeze your shoulder blades together at this point, maximizing rear delt engagement.
- Controlled Return: Slowly extend your arms back to the starting position, maintaining tension in the cable.
- Consistency for Results: Aim for 3 sets of 10-12 reps. The emphasis should be on form and muscle engagement, not on lifting heavy weights.
Reverse Pec Deck Flys

The effectiveness of Reverse Pec Deck Flys in targeting the rear deltoids lies in the mechanics of the movement. As you perform the reverse fly motion, your rear deltoids are activated to control and execute the movement against resistance. This exercise ensures a direct and intense workout, specifically honing in on these crucial shoulder muscles.
How to do it:
- Machine Setup: Adjust the Reverse Pec Deck machine to fit your body. Sit facing the machine with your chest against the pad. Ensure the handles are at shoulder level.
- Grip and Position: Grip the handles or, if your machine has them, place your arms on the vertical pads. Keep your spine straight and feet firmly on the ground.
- The Fly Motion: Initiate the movement by pulling your arms back, keeping a slight bend in the elbows. Focus on using your rear deltoids and upper back to drive the movement.
- Peak Contraction: In the fully retracted position, squeeze your shoulder blades together, emphasizing the contraction in the rear deltoids.
- Controlled Return: Slowly return to the starting position, maintaining control and tension in the rear delt muscles throughout the movement.
- Consistency in Repetition: Aim for 3 sets of 10-12 reps. The focus should be on the quality of movement and muscle engagement, not on lifting heavy weights.
Targeted Exercises With Dumbbells
Dumbbell Reverse Fly
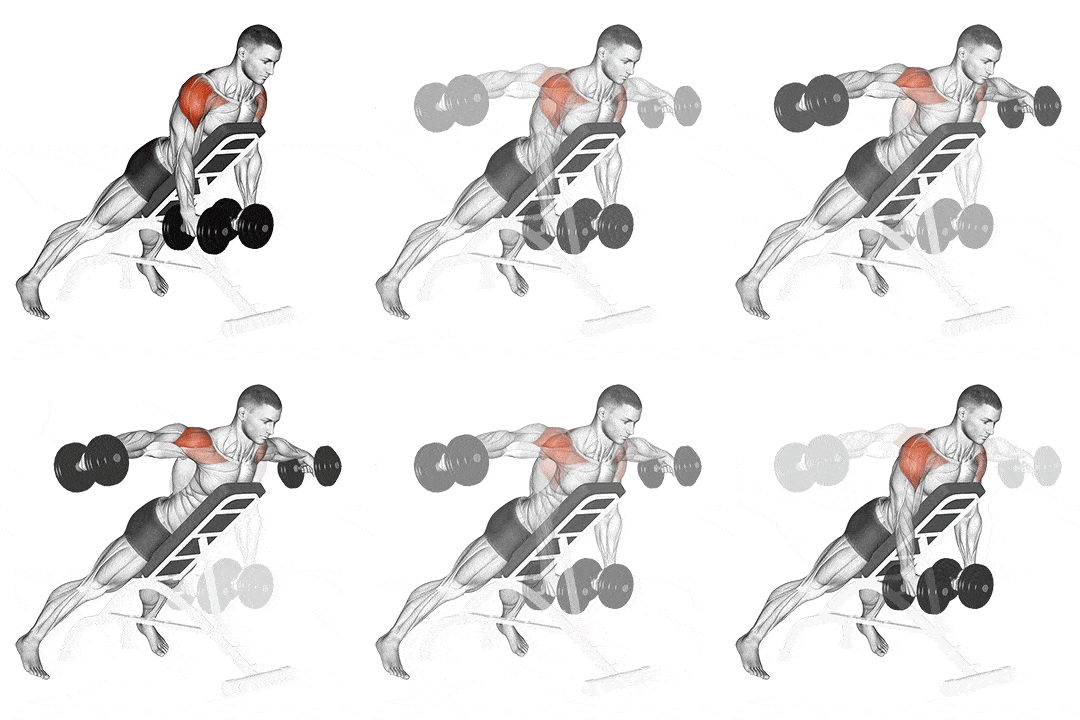
When you execute a Reverse Fly, you’re initiating a movement that’s all about horizontal abduction. That’s a fancy way of saying you’re moving your arms away from the midline of your body, against gravity. This action puts the spotlight squarely on your rear deltoids. It’s like turning on a high beam in a dimly lit room, illuminating those back shoulder muscles that often play second fiddle to their anterior counterparts.
How to do it:
- Setup: Stand with feet shoulder-width apart. Lean forward slightly, maintaining a flat back – think proud chest, not hunchback. Grip a pair of dumbbells with palms facing each other.
- The Lift: Inhale. With a slight bend in your elbows, raise the dumbbells outward and up to shoulder height. It’s not about just lifting; imagine you’re trying to stretch the room’s walls apart with your arms. The focus is on controlled, deliberate movement.
- Peak Contraction: At the top of the movement, squeeze your shoulder blades together. Picture holding a pencil between them – that’s the level of squeeze you’re aiming for.
- The Descent: Exhale as you slowly lower the dumbbells back to the starting position. It’s crucial to resist the pull of gravity here. The lowering phase is just as important as the lift.
- Repetition: Aim for 3 sets of 8-12 reps. Quality over quantity – it’s better to perform fewer reps with proper form than to rush through with sloppy technique.
Incline Dumbbell Y Raises
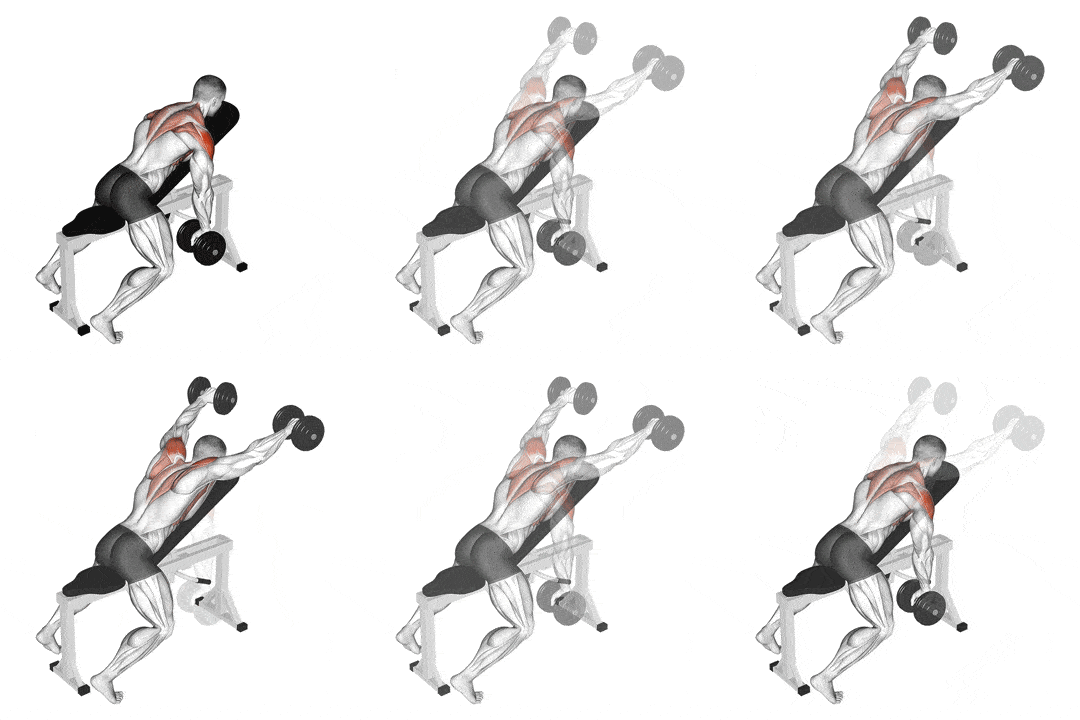
When you perform an Incline Dumbbell Y Raise, you’re engaging in an upward lifting motion that’s diagonally aligned, just like the letter ‘Y’. This unique angle places a higher demand on your rear deltoids, shifting the focus from the more commonly engaged front and middle deltoids. It’s this specific movement that zeroes in on strengthening and defining the rear shoulder muscles.
How to do it:
- Setting the Stage: Lie prone (face down) on an incline bench set at a 45-degree angle. Hold a dumbbell in each hand with a neutral grip, arms extended towards the floor.
- The Lift: Exhale as you raise the dumbbells upward and outward, forming a ‘Y’ shape. Keep your arms straight but not locked. The motion should be smooth and controlled, emanating from the shoulders.
- Peak Engagement: At the top of the movement, your body should form a distinct ‘Y’. This is where your rear delts are engaged the most. Pause and squeeze those muscles for a moment to maximize engagement.
- Controlled Descent: Inhale and slowly lower the dumbbells back to the starting position. The downward phase is just as crucial, as it ensures continuous tension on the rear delts.
- Repetition Counts: Aim for 3 sets of 10-15 reps. This exercise is not about hefting heavy weights; it’s about control and finesse. Lighter weights with perfect form trump heavier lifts every time.
Incline Rear Delt Dumbbell Rows
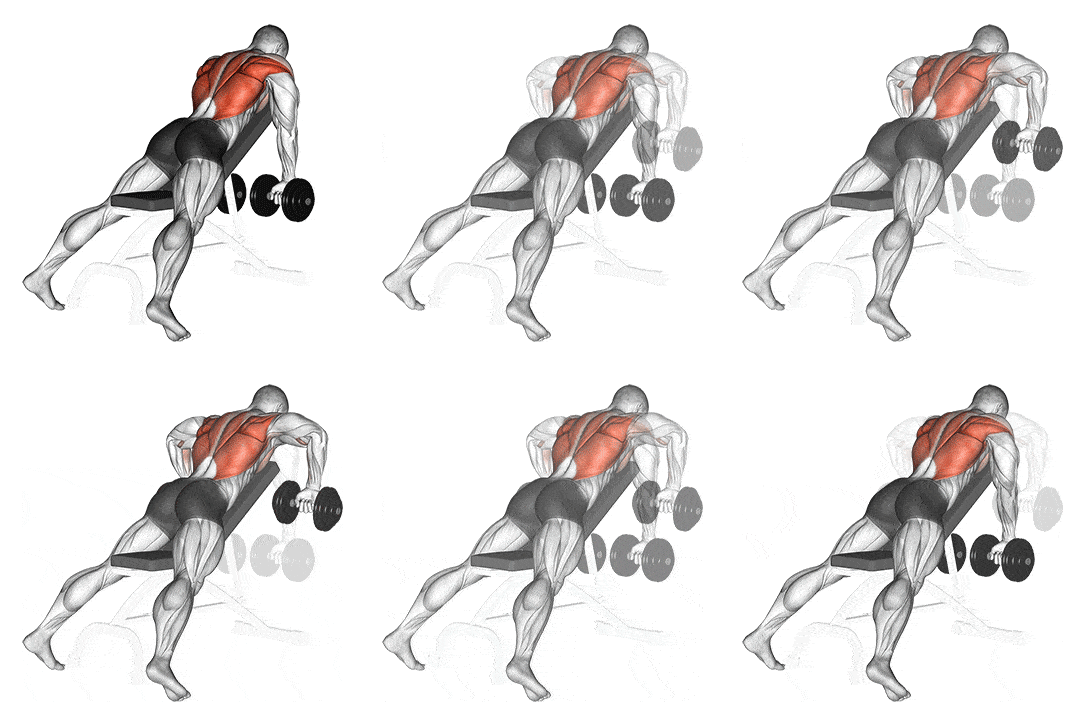
Incline Rear Delt Rows stand out because they isolate the rear deltoids in a way few exercises can. By positioning yourself on an incline bench, gravity works differently, putting the emphasis squarely on the rear deltoids. It’s this specific body alignment and motion that makes your rear delts work harder than ever.
How to do it:
- Starting Position: Set an incline bench to about 45 degrees. Lie face down with your chest against the bench, feet firmly planted. Grab a dumbbell in each hand with a neutral grip.
- Row with Precision: Pull the dumbbells towards your hips, not just up. It’s a subtle but crucial difference. This trajectory ensures your rear delts are doing the heavy lifting, not just your back muscles.
- Mind the Squeeze: At the top of the row, squeeze your shoulder blades together. This isn’t just a row; it’s a deliberate contraction of those elusive rear delt muscles.
- Controlled Descent: Lower the dumbbells slowly and with control. Resist the temptation to let gravity do the work. Your rear delts should feel the tension throughout the movement.
- Repetition and Balance: Consistency is key. Aim for 3 sets of 10-12 reps, ensuring each rep is as focused as the last.
Seated Rear Dumbbell Lateral Raises
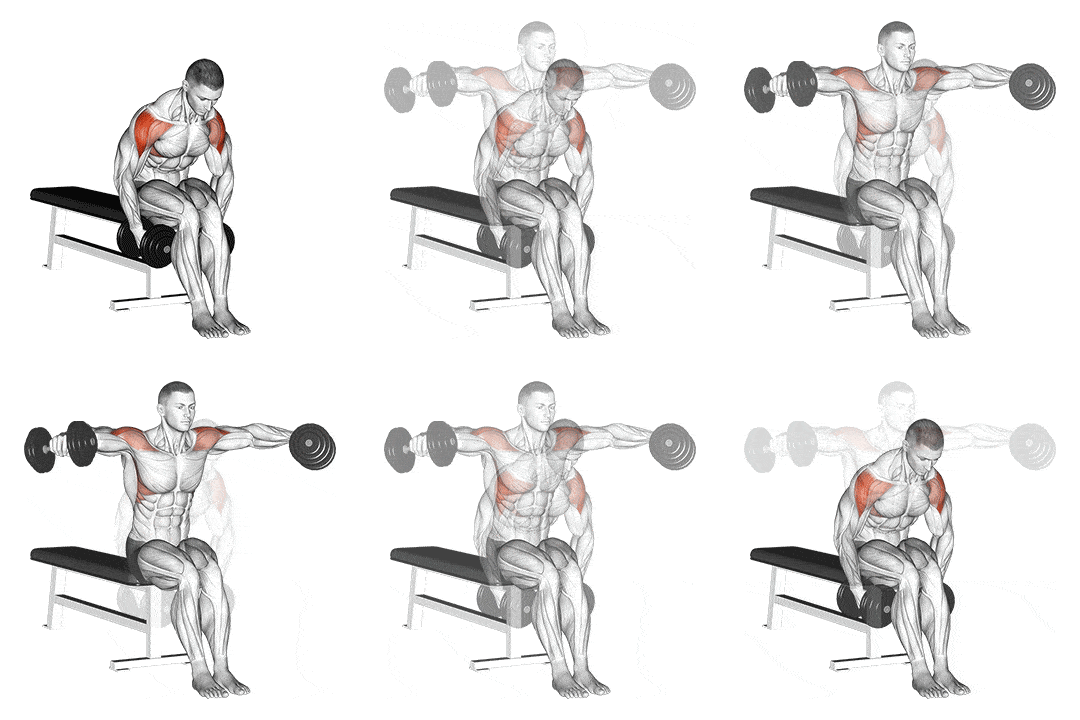
What sets the Seated Rear Dumbbell Lateral Raise apart is its ability to isolate the rear deltoids. By performing this exercise seated, you eliminate most of the body momentum that can detract from pure muscle work. This position ensures that your rear delts bear the brunt of the effort, leading to more focused muscle engagement and development.
How to do it:
- Positioning: Sit on the edge of a bench, feet planted firmly on the ground. Lean forward slightly, maintaining a straight back – think of a strong, confident posture.
- The Lift: Hold a dumbbell in each hand with palms facing in. Keeping a slight bend in your elbows, raise the dumbbells to the sides and slightly forward. Imagine tracing a wide arc with the weights, targeting those rear deltoids.
- Peak Contraction: Once your arms are parallel to the floor, that’s your cue. Squeeze your rear delts like you’re trying to hold a pencil between them. This moment of contraction is crucial for maximum muscle activation.
- The Descent: Slowly lower the dumbbells back to the starting position. This isn’t a race; control is your ally here. The downward motion should be as deliberate as the lift.
- Repetition and Rhythm: Aim for 3 sets of 10-12 reps, ensuring that each rep is performed with unwavering focus and technique.
Dumbbell Y-T-I Raises
Why this combination? The Y-T-I Raises, each with their distinct motion, collectively provide a 360-degree workout for the rear deltoids. The ‘Y’ hits the upper back and delts, the ‘T’ zeroes in directly on the rear delts, and the ‘I’ completes the set with a focus on both rear delts and upper back. This comprehensive approach ensures balanced development and strength.
How to do it:
- Y Raises:
- Starting Point: Lie prone on a flat bench, holding dumbbells with arms extended.
- The Motion: Lift the dumbbells upwards and slightly forwards, forming a ‘Y’ shape. Engage your rear delts and upper back.
- Key Focus: Ensure the movement is controlled and originates from your shoulders.
- T Raises:
- Initial Setup: Maintain the prone position, weights in hand.
- Action: Lift the dumbbells straight out to your sides, forming a ‘T’. This is where your rear delts really feel the burn.
- Control: Smoothly return to the starting position, maintaining tension.
- I Raises:
- Starting Alignment: Same prone position, dumbbells in hand.
- Execution: Lift the dumbbells straight up in front of you, forming an ‘I’. This phase combines the rear delt and upper back engagement.
- Descent: Lower the weights with control, focusing on the rear delt stretch.
Repetition and Consistency Cycle through Y, T, and I without a break, then rest. Aim for 2-3 sets of 8-10 reps of the entire sequence. Remember, it’s not about the weight but the form and the finesse of each movement.
Targeted Bodyweight Exercises
Bodyweight Stability Ball Cobras
What makes the Stability Ball Cobra so effective for the rear delts? The exercise requires you to lift your arms against gravity while maintaining balance on the stability ball. This action engages the rear deltoids intensely as they work to stabilize and lift your upper body.
How to do it:
- Starting Position: Lie prone (face down) on a stability ball, legs extended, toes touching the ground for support. Extend your arms forward, palms facing down.
- Engage and Lift: Engage your core and rear deltoids to lift your chest off the ball. Simultaneously, sweep your arms out to the sides and back, forming a ‘Cobra’ pose with your upper body.
- Peak Contraction: In the lifted position, focus on squeezing your shoulder blades together. This moment of maximum contraction is where your rear delts are fully engaged.
- Controlled Return: Slowly lower back to the starting position, maintaining control and balance on the ball. It’s crucial to move with control to maximize the engagement of your rear delts.
- Repetition for Results: Aim for 3 sets of 10-15 reps. The key is not speed but the quality of movement and muscle engagement.
Band Pull-Apart
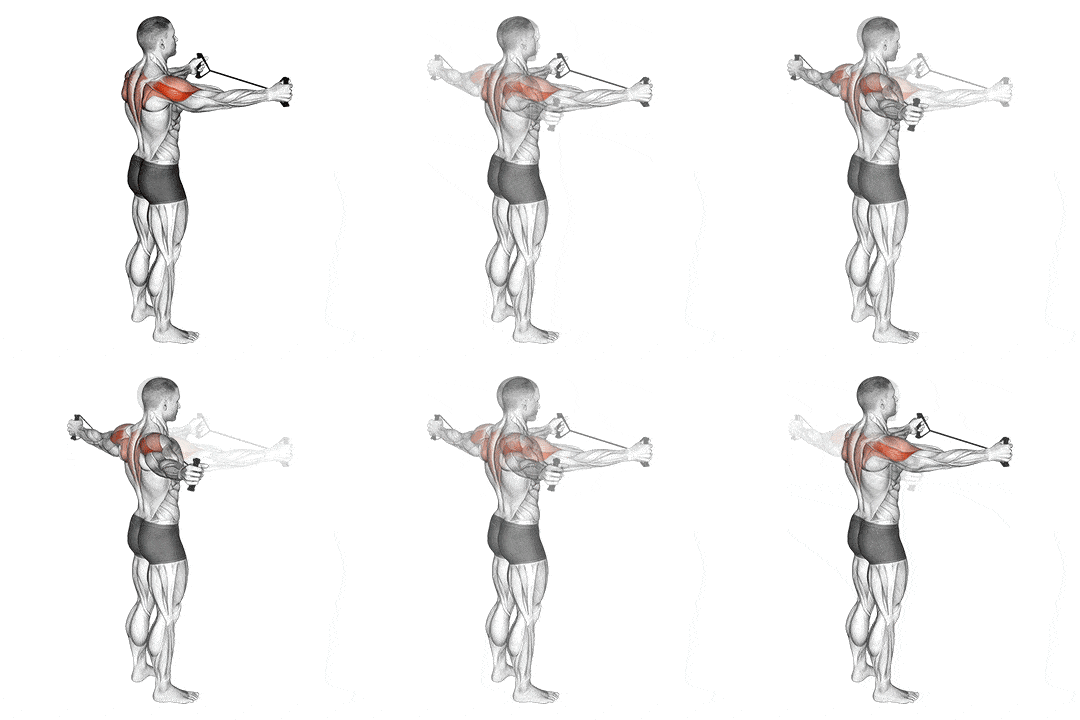
The beauty of the Band Pull-Apart lies in its direct targeting of the rear deltoids through horizontal abduction. As you pull the band apart, the rear deltoids are activated to control and execute the movement. This exercise ensures that these often-overlooked muscles receive the attention they need for balanced shoulder development.
How to do it:
- Selecting Your Band: Choose a resistance band that allows you to perform the movement with good form but also provides enough resistance to challenge your muscles.
- Starting Position: Stand upright with your feet shoulder-width apart. Hold the resistance band in front of you at chest level, gripping it with both hands shoulder-width apart.
- The Pull: Keep your arms straight and pull the band apart, moving your hands out to your sides. The movement should be controlled and originate from your rear deltoids and upper back.
- Peak Contraction: Once your arms are fully extended to the sides, pause and squeeze your shoulder blades together, emphasizing the contraction in your rear deltoids.
- Controlled Return: Slowly bring your hands back to the starting position, maintaining tension on the band throughout the movement.
- Repetition for Results: Aim for 3 sets of 10-15 reps. The key is to focus on the quality of the movement and the muscle contraction, not just going through the motions.
Post Delt Fly With Resistance Bands
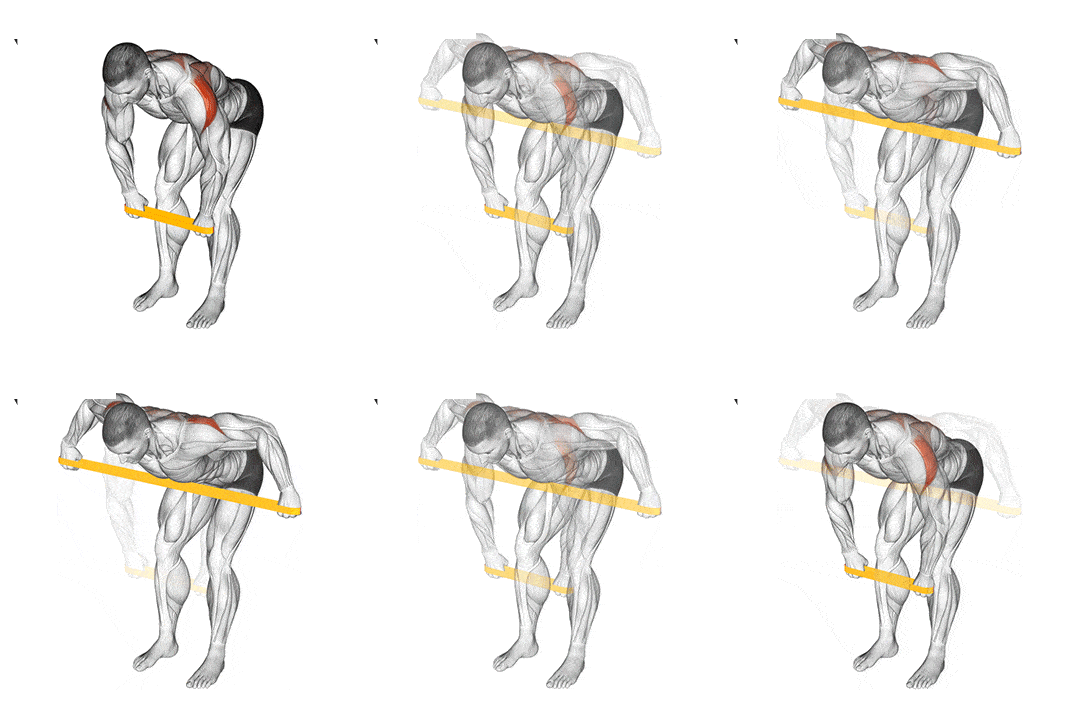
The key to the success of the Post Delt Fly lies in the constant tension provided by the resistance bands. This tension ensures that the rear deltoids are engaged throughout the entire motion, offering a comprehensive workout for these muscles. The resistance from the bands helps to isolate the rear delts, making each rep count towards better definition and strength.
How to do it:
- Selecting Your Band: Choose a resistance band that offers enough tension to challenge your muscles, but still allows you to maintain good form throughout the exercise.
- Starting Position: Stand with your feet shoulder-width apart, stepping on the middle of the band. Grasp each end of the band with your hands.
- The Fly Movement: Bend forward slightly at the waist, keeping your back straight. Hold your arms straight in front of you at shoulder height, palms facing each other.
- Engaging the Rear Delts: Keeping a slight bend in your elbows, open your arms out to the sides, squeezing your shoulder blades together. Focus on using your rear deltoids to power the movement.
- Controlled Return: Slowly bring your hands back to the starting position, maintaining tension in the band and control in your movements.
- Repetition and Consistency: Aim for 3 sets of 10-12 reps. The focus should be on the quality of movement and muscle engagement, not on speed.
References
- https://pubmed.ncbi.nlm.nih.gov/25814379/
- https://www.intechopen.com/chapters/60043
- https://pubmed.ncbi.nlm.nih.gov/12750133/
- https://www.ncbi.nlm.nih.gov/books/NBK557648/

