
Ankle mobility often gets overlooked in fitness routines, yet it plays a crucial role in everything from squats to running form.
Poor ankle dorsiflexion can lead to compensations up the kinetic chain, affecting knee and hip mechanics.
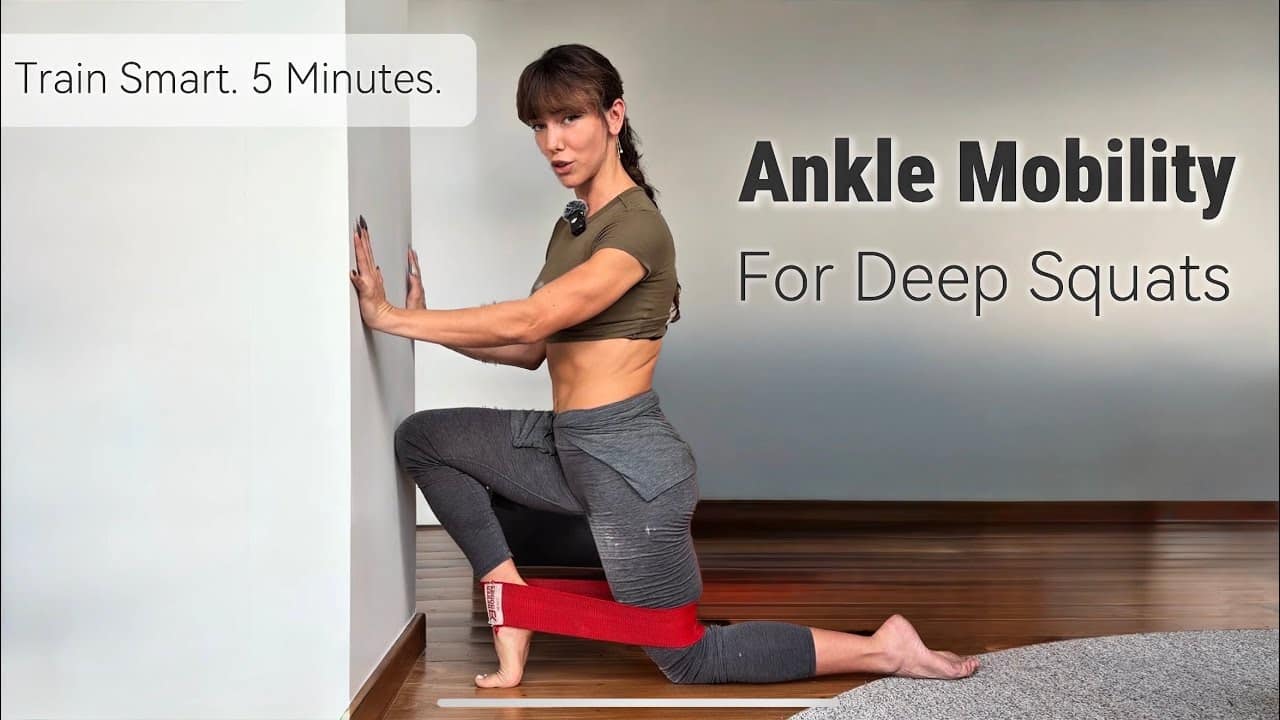
A targeted ankle mobility drill using just a resistance band and a wall can dramatically improve range of motion and movement quality.
This exercise focuses on active dorsiflexion while maintaining proper alignment—a game-changer for anyone looking to enhance their lower body performance.
Jump to:
Equipment Setup: Keep It Simple
The beauty of this ankle mobility drill lies in its minimal equipment requirements. All that’s needed is a hip band (or regular resistance band tied into loops) and access to a wall.
The band serves dual purposes: creating resistance around the ankle joint while providing tactile feedback for proper knee tracking. One loop goes behind the knee of the back leg, while the other wraps around the ankle of the front working leg.
Finding Your Starting Position
Proper positioning makes all the difference in exercise effectiveness. Place the front foot directly in front of the knee, with the back foot aligned with both the front foot and knee—creating a straight line.
The distance from the wall determines intensity. Moving the back knee further from the wall increases difficulty, while bringing it closer makes the exercise more accessible.
For the working front leg, find the maximum distance where the knee can barely touch the wall without the heel lifting. This sweet spot ensures optimal training stimulus without compensation patterns.
The Movement Pattern: Precision Matters
The exercise follows a specific sequence repeated five times per leg. Drive the knee forward toward the wall while maintaining alignment with the toes—avoiding inward or outward collapse.
Simultaneously push the pad of the big toe into the floor to prevent the foot from rolling outward. This detail protects the ankle joint while maximizing mobility gains.
Push the wall to push the heel down. Bring the toes towards your shin. So you want to feel your dorsif flexors working just for a second and go back.
After each wall touch, actively engage the dorsiflexors by pulling the toes toward the shin. This eccentric control builds strength through the newly acquired range of motion.
Progressive Distance Challenge
Between repetitions, move the front foot slightly backward—just one centimeter or less. This micro-progression gradually increases dorsiflexion demand while maintaining perfect form throughout all five reps.
The Five-Second Hold: Building Strength
After completing five reps, the protocol shifts to an isometric hold. Keep the knee pressed against the wall while bringing the toes toward the shin for a full five-count.
This sustained contraction strengthens the anterior tibialis and surrounding dorsiflexor muscles, which are often weak in people with limited ankle mobility.
Five. Four. Three, two, one. Then we want to go to demi point. Keep the knee on the wall as you’re pushing your heel forward.
The Demi-Point Challenge: Advanced Control
The final phase tests true ankle control. From the five-second dorsiflexion hold, transition into demi-point (rising onto the ball of the foot) while maintaining knee contact with the wall.
Push through the pad of the big toe rather than just the toes themselves. This subtle distinction engages the foot’s intrinsic muscles and prevents compensation through the smaller toes.
Lower back down slowly with control—the eccentric portion where much of the strengthening occurs. Expect some shakiness, especially on the first few attempts.
Repeat the Sequence
The complete demi-point sequence repeats three times total:
- Five-second dorsiflexion hold with toes pulled toward shin
- Rise to demi-point pushing heel forward while knee stays on wall
- Controlled descent maintaining alignment throughout
- Reset with heel down before the next repetition
If you really bring it forward, you can almost feel it cramping in the calf and back down. Let it shake.
Common Compensation Patterns to Avoid
Several faults can diminish exercise effectiveness or create unwanted stress. Knee valgus (inward collapse) or varus (outward movement) indicates insufficient hip stability or ankle control.
Rolling onto the outer edge of the foot represents another common compensation when dorsiflexion range proves insufficient. Combat this by actively pressing the big toe pad into the ground throughout the movement.
Rib flaring and loss of core engagement often accompany challenging ankle positions. Maintain neutral spine and engaged abdominals to prevent compensatory movement through the trunk.
Modifications for Comfort
The kneeling position can create discomfort on the back knee, especially on hard surfaces. Place a pad, folded towel, or yoga mat under the knee for cushioning without compromising exercise mechanics.
Adjusting wall distance provides instant scaling. Those new to ankle mobility work should start closer to the wall, while advanced practitioners can step further back for increased challenge.
Why Dorsiflexion Matters
Adequate ankle dorsiflexion allows proper squat depth without heel lift or forward torso lean. Limited range forces compensations that stress the knees and lower back.
Running mechanics also depend heavily on ankle mobility. Insufficient dorsiflexion during the stance phase can lead to early heel lift, reduced stride efficiency, and increased injury risk.
The anterior tibialis muscle strengthened through this drill acts as a critical shock absorber during landing movements and decelerations. Weak dorsiflexors contribute to shin splints and other overuse injuries.
Programming This Drill
Incorporate this ankle mobility sequence into warm-ups before lower body training sessions. The combination of mobility and activation primes the ankle complex for loaded movement patterns.
Perform 2-3 times weekly for noticeable improvements within four to six weeks. Consistency trumps intensity with mobility work—regular practice yields better results than occasional aggressive stretching.
The entire protocol takes roughly five minutes per leg, making it an efficient addition to any training routine. Those with significant restrictions may initially need to perform this daily for accelerated progress.