Why is it important to understand the right way to row? The rowing machine exercise is currently gaining popularity. In fact, there are now entire studios dedicated to it and its incredible full-body workout benefits. This article will teach you the proper rowing form and the common mistakes.
At first, the device could seem scary. Do I use my arms or legs to lead? Should I feel shoulder pain? Then why are my feet constantly slipping out of the straps?
You are not alone. It’s important to remember that “it is about power and control, not necessarily speed,” as many experts in the area will say. If you leave a rowing class with a sore back, you’re doing it wrong.
Instead, focus on pushing yourself out and sliding back in using your lower leg muscles.
So here’s everything you need to know about rowing.
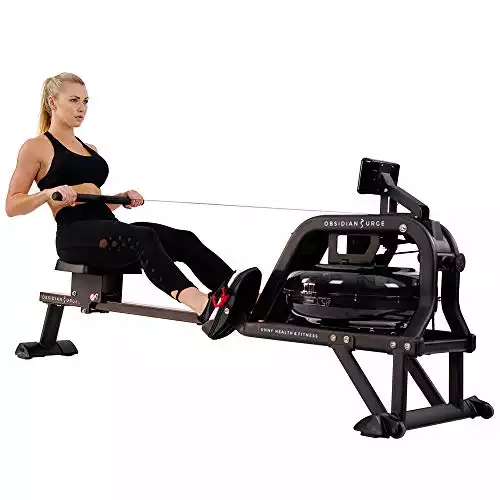
Based on our testing, this is the best rower for beginners. For less than 500$, this silent water rower will last you for years. It also comes with a 12-year warranty.
- Affordable
- Quiet
- Amazing warranty
Prefer video? Here’s a complete tutorial we created just for you:
Jump to:
The Proper Technique When Rowing
Sit on the rowing seat and put your feet on the foot pedals before you begin the rowing motions. Then, while sitting upright and bending your knees, lean forward until your feet are on the pedals.
Using the adjustable straps, secure your feet to the pedals. If your foot pedal supports it, use the foot length adjuster to help the pedal properly fit into your foot.
Then, with your back straight, lean slightly forward and stretch your arms to hold the handle. Your hands should be holding the handlebars loosely but securely. Here are some steps that will guide and make you understand how to row properly
STEP 1: use your legs first
The rowing movements begin with your legs. Push through the heel and mid-foot to move your body back, keeping your arms straight and a solid grip on the handle. It is important to keep in mind not to fully straighten your legs when pushing the foot pedal.
After a hard power stroke, if you fully extend your legs, this may cause the knees to lock out and overextend, potentially injuring the knee joint and surrounding tendons and ligaments.
STEP 2: start pulling
Just before you finish your leg push exercise, start pulling on the handlebar while bending your elbows. Lean back slightly while pulling with your arms, keeping your upper body, head, and neck straight. To avoid any risk of injury
STEP 3: pull the bar
Pull the bar to the area between your navel and lower chest using your back and biceps muscles. As you finish the pull, keep your elbows tight to your torso. A small backward lean aids in pulling the rowing rope slightly further, resulting in a more powerful rowing stroke.
STEP 4: maintain posture
You can maintain a tight core and good posture by moving forward a little. Put the rowing seat in the starting position by bending your knees. First, let your arms extend before going back to the starting position.
When returning to the starting position, extend your arms first before bending your knees. The handlebar could hit your knees if you don’t.
4 Rowing Machine Workouts Positions
“The Catch” – Rowing Position 1
A: Firmly grip the handle while keeping your wrists flat.
B: Extend the arms in the direction of the flywheel
C: Maintain a straight back and a slight forward inclination.
D: Knees bent to hold a forward body position
“The Drive” – Rowing Position 2
A: Extend your arms and push down on the foot pedals.
B: Keep a strong, upright posture with a tight core.
C: Simply pull on the handle while leaning back slightly before fully stretching your legs
“The Finish” Rowing Position 3
A: Pull the handle all the way to your navel and your chest.
B: Keep exhaling while extending your legs to near full extension and leaning back.
“The Recovery” Rowing Position 4
A: Extend your arms in front of the rower.
Based on our testing, this is the best rower for beginners. For less than 500$, this silent water rower will last you for years. It also comes with a 12-year warranty.
- Affordable
- Quiet
- Amazing warranty
B: Lean forward with your torso, following your arms to the front of the rower.
C: Bend your knees and allow your hips to move the seat back into “The Catch” position.
D: Take a deep breath before your next stroke!
To get the appropriate rowing machine form, follow these four steps.
Rowing sessions are a more sophisticated cardio option, but they are also a lot of fun and effective. To begin, perfect your rowing form by practicing and filming yourself.
Common rowing mistakes and how to avoid them
Here are the mistakes you should avoid to row properly and do not get injured.
Do not hunch your back
The first mistake is that you hunch your back. This usually indicates that you are allowing your shoulders to do all the work.
The solution: Start by correcting your posture. Make sure your posture is perfect, it will even ease your back pain.
Push your shoulders back (to open your chest) and down (to release tension around your neck). Maintain your straight posture by activating your core and breathing deeply. It isn’t easy to take deep breaths when you have poor posture.
Do not make a scooping movement
Because rowing is a chain reaction, one wrong form decision might lead to another.
The solution: to avoid hitting your legs with the oar, you’ll need to perform this scooping movement if you bend your knees before fully extending your arms on the return.
Your arms are raised too high to row properly.
Don’t decapitate yourself with the oar! According to experts, pulling the oar all the way up to your chin is not just incorrect form; it also indicates that you’re consuming more energy than necessary.
The solution: Bring the oar approximately below your chest.
Pull the bar toward your chest using your upper-back major muscles. At the end of each row, your elbows should be bent beyond 90 degrees, and the angle of your forearms should be aligned with your rib cage.
You allow your knees to drop to the side
We enjoy stretching, but letting your knees flop wide is too much for a Rowing workout. It’s most likely because you’re not engaging your inner thighs or activating your hip flexors.
The solution: Finish with your knees side by side with your hips.
Keep your knees tight together by using your inner thighs, or consider zipping up your legs as you push them away and slide in.
Another solution: Place the strap around your big toe joint.
Another way to keep your knees from flopping is to properly strap your feet. We place the adjustable strap around the base of your big toes. Your toes should be comfortably bent so that you can push off with the balls of your feet.
You’ve got a death grip on the oar.
Let’s relax, shall we? We get your excitement, but there’s no need to wrap your thumbs around the oar or cling to it like a pull-up bar. A grip like this is likely to cause unneeded tension in your forearms.
The solution: is to hold the oar with three fingers.
Place your hands on the oars outside (not in the center). Each hand’s first, middle, and ring fingers should be used to hold the oar. Float your pinky fingers off the end and rest your thumbs on top rather than wrap them around.
Use your upper back, not your shoulders and biceps, whenever you pull back. This will relieve some strain on your shoulders.
How To Row Properly Final Toughs
Finally, whether you’re lifting more weight or pounding out more reps, you now understand the proper form. Your body will be consistently improving and gaining strength at an incredible rate.
However, if you have a specific objective in mind (losing weight, bulking up, preparing for a marathon, etc.), you should let those goals define your rep range. Then, choose a weight that will make you work hard when you have to lift it that many times.

