
Split squats might be one of the most dreaded exercises in any gym routine, but they’re also one of the most effective for building powerful quads and glutes.
The love-hate relationship most people have with this movement stems from its physically and mentally exhausting nature.
However, mastering proper technique can unlock serious lower body potential, whether goals include muscle growth, strength gains, or injury rehabilitation.
Physical therapist and fitness expert from E3 Rehab recently broke down everything needed to perform perfect split squats, including rear foot elevated variations that take the exercise to another level.
Jump to:
Understanding Split Squat Mechanics
Body positioning determines which muscles bear the brunt of effort during split squats. Trunk and shin angles, along with load placement relative to hips and knees, influence whether quads or glutes receive more emphasis.
For glute-focused split squats, maintaining a forward trunk lean with a relatively flat lower back and vertical shin on the lead leg creates optimal muscle activation. For quad-dominant variations, an upright trunk combined with deep knee flexion and a more angled shin shifts tension to the front of the thigh.
Most training programs can incorporate any combination of these two approaches.
For this reason, there is no single best approach to performing split squats.
Basic Split Squat Execution
Starting position matters tremendously. Begin with feet roughly shoulder-width apart, then take one large step backward into a stride stance. Slowly lower down, stand back up while keeping both feet planted, and repeat.
The key difference between split squats and lunges? Both feet remain stationary throughout the entire movement. No stepping forward or backward occurs with split squats.
Six Essential Tips for Perfect Form
- No perfect stance width exists – Too narrow throws off balance, while too wide feels awkward
- Pretend there’s an egg on the ground – Tap it gently rather than crashing down with each repetition to develop movement control
- Use foam pads initially – Reduce range of motion with a foam pad, towel, or pillow under the back knee if needed
- Don’t fear assistance – Use a dowel or wall for hand support while learning proper mechanics
- Weight distribution matters – Most weight should transfer through the front leg, though no exact percentage exists
- Experiment relentlessly – Technique improves with practice and preferences evolve over time
Starting from a half-kneeling position on a foam pad helps many people find their preferred setup. Looking in a mirror, positioning hips and knees at roughly 90-degree angles, then standing up from there provides an excellent reference point.
The Knees-Over-Toes Variation
Recent training trends emphasize driving knees over toes on the lead leg while keeping the back knee relatively straight. This technique requires more forward and backward motion compared to the primarily vertical movement pattern.
This style places significantly more demand on the knee and quads of the front leg. It also requires greater ankle dorsiflexion range of motion in the front leg, plus increased hip extension and big toe extension mobility in the back leg.
Neither approach is inherently superior – context determines which variation serves individual goals best.
Rear Foot Elevated Split Squats
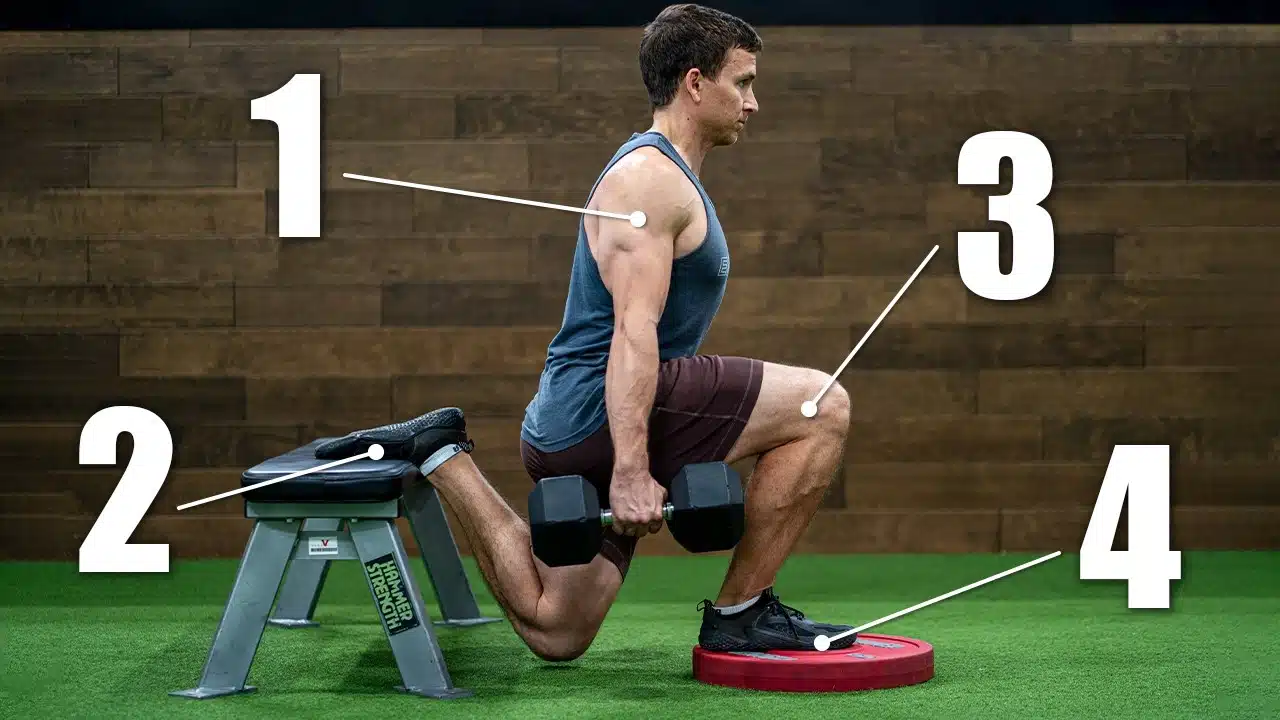
Also known as Bulgarian split squats, this variation positions the back foot on a bench, box, or similar elevated surface. The movement maintains the same principles as regular split squats regarding shin and trunk angles.
Most beginners shouldn’t obsess over minor technical details immediately. Confidence and technique naturally improve with consistent practice over time.
Five Critical Rear Foot Elevated Tips
- Avoid excessive elevation – Lower surfaces work better if quad flexibility limitations prevent full depth or create discomfort
- Emphasize the bottom position – Maximum benefits come from the bottom of the movement, so tap that back knee down if possible
- Foot positioning matters – Placing the top of the foot flat (laces down) on the elevated surface feels easier than extending the big toe
- Front leg bears most weight – Roughly 70% or more should transfer through the lead leg, though no golden rule exists
- Film yourself regularly – What feels correct might look completely different on video
Setup Strategy
Finding optimal distance from the bench presents the biggest challenge. A viral trend recommends sitting on a bench edge, extending one leg, standing on that leg, placing the other foot on the bench, then performing the movement.
While this works for many individuals, it won’t suit everyone or every split squat style perfectly.
Rear foot elevated split squats have been a staple in my training routine for over a decade, and I still use some trial and error every time I set up. It’s the nature of the beast.
Hopping around during warm-up sets to find preferred positioning remains common even among experienced lifters. Marking floor positions with bands or finding natural floor landmarks helps maintain consistency across sets.
Endless Equipment and Loading Options
Split squat versatility remains unmatched among lower body exercises. Loading options include barbells, kettlebells, dumbbells in both hands, or a single dumbbell in one hand.
Holding a dumbbell in the opposite hand from the working leg biases the gluteus medius of the lead leg. Smith machines reduce the balance component significantly, making them excellent for this movement.
Front rack barbell positions create brutal variations. Additional setup modifications include front foot elevation, deficit variations, or heel elevation – each serving different purposes based on mobility needs or strength goals.
Rehabilitation Applications
Split squats provide tremendous value during injury rehabilitation. Pain during training represents a normal human experience when working out long-term, but months or years of setbacks don’t have to be normal.
When dealing with low back, hip, or knee discomfort, first assess training volume, intensity, and frequency. Doing too much, too soon remains the classic culprit. Adjust those variables by lowering weight or reducing sets per week.
Pain-Specific Modifications
Low back pain – Reduce external load by half or more since the unilateral nature requires less total weight. Maintain an upright trunk to minimize spinal stress.
Hip pain – Utilize upright posture rather than forward trunk lean to decrease hip joint demand.
Knee pain – Purposely lean forward and maintain a more vertical shin angle to reduce knee stress.
Additional strategies include shortening range of motion with pads, using hands for assistance via suspension trainers, incorporating long-duration isometrics, trying slower tempos, or experimenting with higher repetition ranges.
Programming Recommendations
Most training programs incorporate two to four sets of three to 20 repetitions per leg. The middle of that range typically optimizes strength and muscle growth, while excessive repetitions feel more like cardio.
For straight sets, resting one to two minutes between legs works well. Complete a set on the left leg, rest one to two minutes, perform a set on the right leg, rest again, then repeat.
Split squats interchange effectively with squats, lunges, step-ups, leg presses, and similar movements. This allows programming them one to three times weekly depending on experience level and goals.
Performing hard sets of split squats and other quad-dominant exercises on the same day often proves redundant. However, pairing them with RDLs, hamstring curls, or 45-degree hip extensions creates balanced lower body development.
Complete beginners should start with regular split squats before progressing to rear foot elevated variations. Eventually, deficit rear foot elevated split squats provide maximum range of motion and difficulty.
Advanced trainees might perform the knees-over-toes variation as a mobility-focused warm-up, then transition to heavy deficit rear foot elevated split squats for maximum strength and hypertrophy stimulus.
Your preferences and goals will likely change over time though. You might vary your choice every few months, choose two split squat options to perform on different days of the week, or make small changes to your technique as needed.
Individualizing training based on personal goals, preferences, and needs remains paramount. No universal template exists – experimentation and consistent practice lead to mastery.